
Installing Raspberry Pi OS Step by Step Guide Part 2 is a follow on from Part 1. If you’ve followed the first step of steps then you should have your Raspberry Pi setup so you can access via SSH without requiring a display attached. I, for instance am configuring my Pi over Wifi with just a power cord plugged into my Raspberry Pi.
In this part, I am going to run through the steps to remotely connect to your Raspberry Pi via SSH and then enable VNC so you can remotely control the desktop. I’ll also execute a few commands so the Pi has it’s packages are up to date. This is good practise.
Remote Connection to Raspberry Pi with SSH
I’m using Terminal on my Mac, but you achieve a similar outcome using PuTTy on a Windows device.
Open up Terminal and type the following command:
ssh pi@raspberrypi.localFor the first connection you will be asked if you would like to add this to your list of known hosts. The message within the terminal looks something like:
This key is not known by any other names
Are you sure you want to continue connecting (yes/no/[fingerprint])?
To accept, type in ‘yes’ and then press Return
You should be asked to supply your password then get connected via SSH. The terminal should look something like this:

Installing Raspberry Pi OS – Initial Configuration
OK, now we are connected, we can do some updates and then configure VNC for remote access of the desktop.
First off type the following command:
sudo apt-get updateThis command will retieve and updated list of packages from the internet – once you’ve done this you can upgrade your packages by typing the following command:
sudo apt-get upgradeWhen prompted click on ‘y’ to download and install the updated packages. This may take a few minutes to complete, so is a good time to grab a brew.
Enabling VNC on Raspberry Pi
Handily, your Raspberry Pi OS already includes a VNC server in the build you just need to enable it and make a few tweaks to configure it.
To access the Raspberry Pi configuration page where you can enable vnc type the following command:
sudo raspi-configThis will present a menu where you can make a series of settings changes, which looks like this:

Selelct Option 3 ‘Interface Options’ and then select ‘I3 VNC’

Choose ‘Yes’ from the choices and you should be rewarded with confirmation, which looks like:

Now Select OK.
Now you have VNC enabled so that you are able to remotely access you now enable Auto Login. This is within System Options:

Choose B4, so your Raspberry Pi automatically logs in as the Pi user:
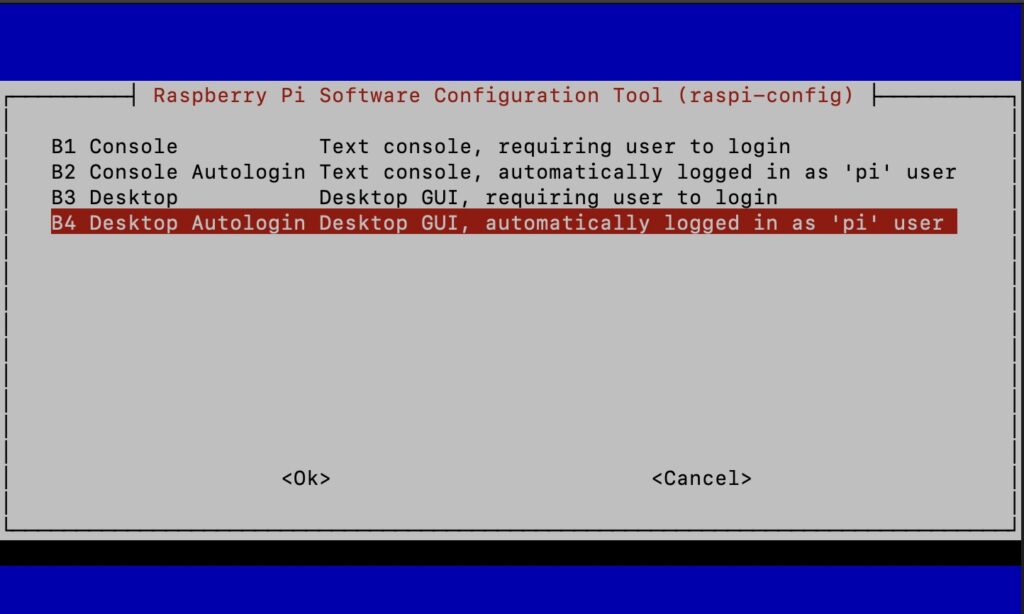
When you have done this you can go to Finish by pressing on your right arrow on the keyboard and when being asked if you would like to reboot select ‘Yes’. Wait a few minutes and you should be able to reconnect to your Raspberry Pi via SSH.
Testing VNC remote access
The easiest way to test you VNC server os running properly on your Raspberry Pi is to install VNC Viewer on your computer. You can get this from: https://www.realvnc.com/en/connect/download/viewer/. The software is free for personal use.
Once installed your should be able to insert the address of your Raspberry Pi into the menu bar:

You will be asked to insert your Raspberry Pi username and password – these are the Pi credentials created in Part 1.
Once these have been accepted you will be presented with your Raspberry Pi Dekstop:

So there you have it, a fully working Linux desktop running headless with no need for a screen, keyboard or mouse.
Installing Raspberry Pi OS Step by Step – Final Thoughts
VNC isn’t a secure form of connection, so having this running on anything other than a private network is strongly advised against.
You can play around with various settings to make your experience a little bit easier. For instance I change the defaul wallpaper to the Pi logo and the font colour to black as it makes it easier to work with and know what I’m remoted onto.
Raspberry Pi is a low-cost way of having a browser window open. Great for a desktop browser, but don’t want your Mac or Windows computer running all of the time.
If you’ve arrived at this page before Installing Raspberry Pi OS Step by Step Guide Part 1. You can click on the title to go there.
No Responses